Managing component state with the useState Hook
This article covers
- asking React to manage state values by calling useState
- using state values in your component’s UI
- changing state values and triggering re-renders with an updater function
If you’re building React apps, then you’re expecting the data your app uses to change over time. Whether it’s fully server-rendered, a mobile app or all in a browser, your application’s user interface should represent the current data or state at the time of rendering. Sometimes multiple components throughout the app will use the data, and sometimes a component doesn’t need to share its secrets and can manage its own state without the help of mammoth, application-wide state-store behemoths. In this article, we’ll keep it personal and concentrate on components taking care of themselves, without regard for other components around them.
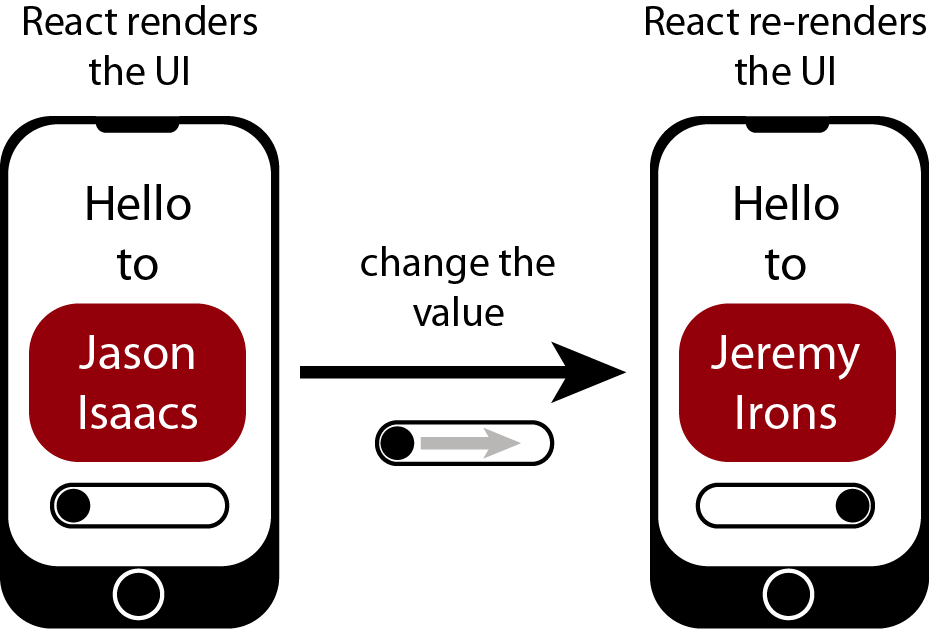
Figure 1 shows a very basic illustration of React’s job: it should use the current state to render the UI. If the state changes, React should re-render the UI. We usually want the state and UI to always be in sync (although we might choose to delay synchronization during state transitions, like when fetching data).
React provides a couple of functions, or hooks, to enable it to track values in your components and keep the state and UI in sync. For single values it gives us the useState hook and that’s the hook we’ll explore in this article.
There’s a little bit of housekeeping to set up our example app but once that’s done we’ll be able to concentrate on a single component.
1 A bookings manager: setting up the App
Your fun but professional company has a number of resources that can be booked by staff: meeting rooms, AV equipment, technician time, table football and even party supplies. One day, the boss asks you to create a component for the company network that lets staff select a resource to book in a booking application. The component should display a list of resources, or bookables, filtered by group, and highlight the one currently selected. When a user selects a bookable, its details can be displayed, as shown in Figure 2.

The container App that uses our components will change very little. We’ll introduce its key parts in the next two sections.
1.1 Bookings app project structure
Use create-react-app to generate a new React project called bookings. From the public folder, remove all but index.html. From the src folder, remove all but index.js and App.css. The file listing on the left of Figure 3 highlights the files to remove.
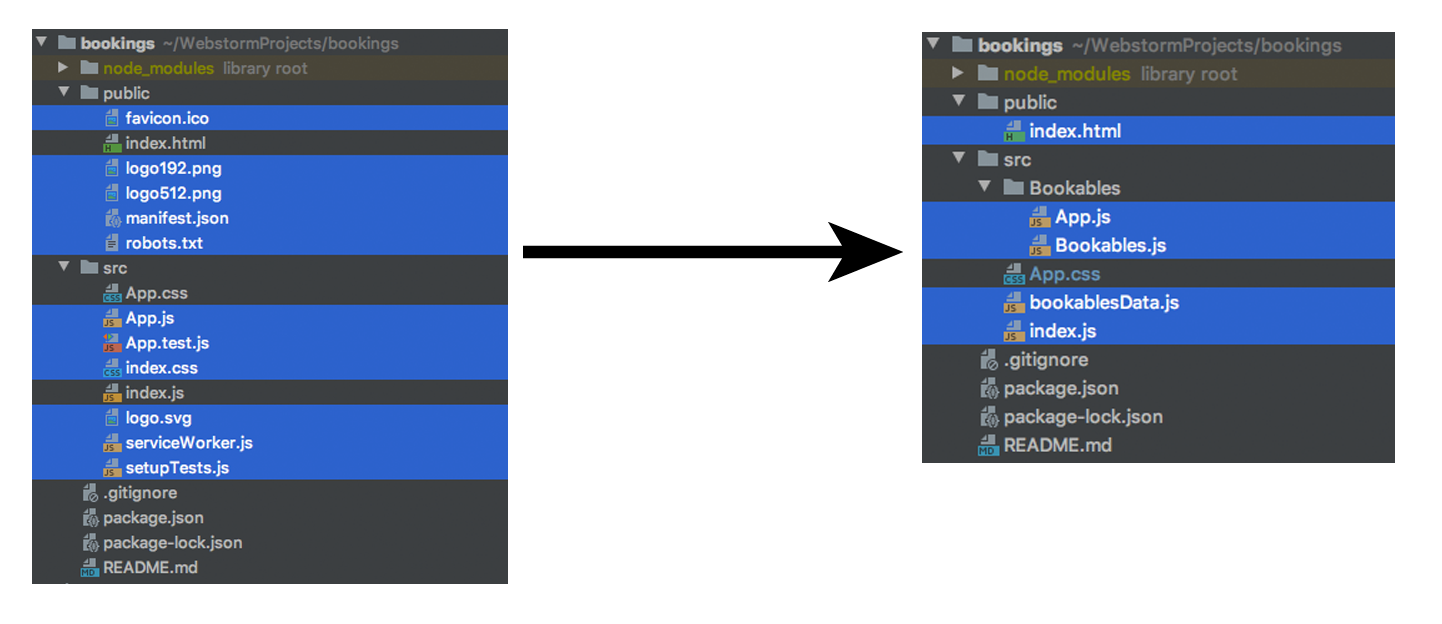
The file listing on the right of Figure 3 highlights the six key files that will always be part of our bookings application. There are three that will not change:
- /public/index.html - the web page that will contain the app.
- /src/bookingsData.js - the data for all the company resources that can be booked in the app.
- /src/App.css - a few styles for the app and components.
The version of the Bookables component we’ll work on in this article will be in the Bookables folder. Within each version folder there will be at least these two component files:
- App.js - the root component that’ll contain all others.
- Bookables.js - the component we’ll be developing throughout the chapter.
The last file is the entry point into the application:
- /src/index.js - the file that imports the App component and renders it to the index.html page.
First, let’s create the first five files that won’t change.
1.2 Five files that won’t change
We’ll start work on the Bookables component itself in Section 2. In this section we’ll set up the remaining five key files.
Inside the public folder, edit the index.html file. A lot of the create-react-app generated boilerplate can come out. The div element with an id of root must remain and will be the container element for the app. React will render the App component into that div. You can also set the title for the page, as has been done in Listing 1. (You can find the code examples for React Hooks in Action on GitHub at https://github.com/jrlarsen/ReactHooks organized by chapter and by focus.)
<!DOCTYPE html>
<html lang="en">
<head>
    <meta charset="utf-8" />
    <meta name="viewport" content="width=device-width, initial-scale=1" />
    <title>Bookings App</title>
</head>
<body>
<noscript>You need to enable JavaScript to run this app.</noscript>
<div id="root"></div>
</body>
</html>
In Listing 2 you can see that App.js currently just renders the Bookables component in an enclosing div, passing the component the bookables data.
import React from "react";
import "../App.css";
import bookablesData from "../bookablesData";
import Bookables from "./Bookables";

const App = () => {
  return (
    <div className="App">
      <Bookables bookablesByGroup={bookablesData} />
    </div>
  );
};

export default App;
App.js pulls in the Bookables component from the same folder. App.js also imports the data for the app, the list of bookable resources for the company organized by group, as shown in Listing 3.
const bookablesData = {
  rooms: [
    {
      title: "Lounge",
      notes: "A relaxing place to hang out."
    },
    {
      title: "Meeting Room",
      notes: "Formal. Seats 12."
    },
    {
      title: "Games Room",
      notes: "Table tennis, table football, pinball!"
    }
  ],
  kit: [
    {
      title: "Projector",
      notes: "Powerful and sharp."
    },
    {
      title: "Wireless mics",
      notes: "Really handy but don't forget to switch them off."
    }
  ]
};

export default bookablesData;
Feel free to add more groups and bookables and more detailed notes for each item. There are also just a few styles to prettify the examples in the article, as shown in Listing 4.
.App {
  font-family: sans-serif;
}
main {
  text-align: center;
  margin: 40px;
  display: grid;
  grid-template-columns: 1fr 5fr;
  grid-column-gap: 20px;
}
.bookables {
  margin: 1em auto;
  padding: 0;
  list-style: none;
}
.bookables > li {
  margin: 0 0 1em;
  padding: 1em;
  border: 1px solid silver;
}
.selected {
  background: #ddd;
}
Before we get started on the Bookables component itself, we still need a way in to the application, a file that imports the App component for the current version. Let’s get that vital piece of plumbing sorted. In the root folder of the application, edit the index.js file to look like Listing 5. It imports the App component and renders the App into the root div seen in Listing 1.
import React from 'react';
import ReactDOM from 'react-dom';
import App from './Bookables/App';

ReactDOM.render(
  <App />,
  document.getElementById('root')
);
Okay, with our app plumbing securely in place, let’s turn on the faucet and get some data flowing into our first Bookables component!
2 Storing, using and setting values with useState
Your React components provide UI for your application. Sometimes they are unchanging - maybe headers or logos or footers - but often they include data that changes. If components are just functions, how can they persist their state across renders? Are their variables not lost when they finish executing? Well, the simplest approach to manage state is to engage React’s help, with the useState hook.
2.1 Calling useState returns a value and an updater function
We want to alert React that a value used within a component has changed so it can re-run the component and update the UI if necessary. We need a way of changing that value, some kind of updater function, that triggers React to call the component with the new value and get the updated UI, as shown in Figure 4.

In fact, to avoid our component state value disappearing when the component code finishes running, we can get React to manage the value for us. That’s what the useState hook is for. Every time React calls our component to get hold of its UI, the component can ask React for the latest value and for the value’s updater function. The component can use the value when generating its UI and use the updater function when changing the value, for example in response to events.
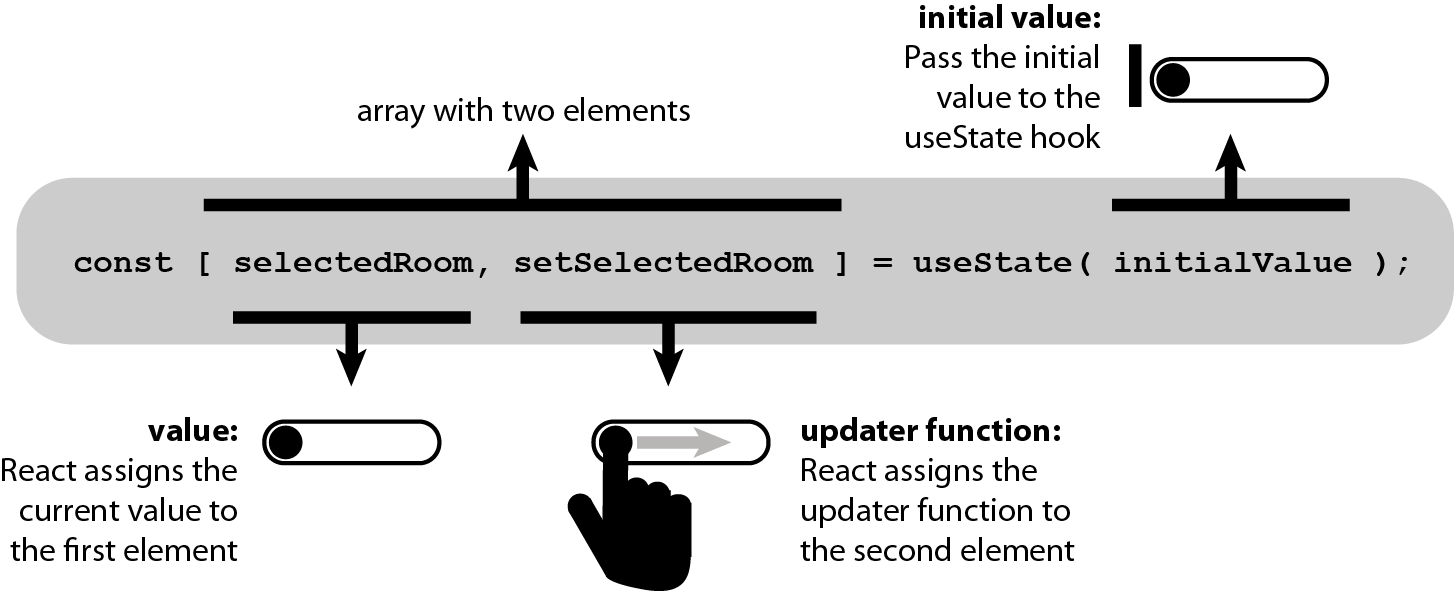
Calling useState returns a value and its updater function as a tuple, an array with two elements, as shown in Figure 5.
You could assign the returned array to a variable, and then access the two elements individually, by index, like this:
const selectedRoomArray = useState();

const selectedRoom = selectedRoomArray[0];

const setSelectedRoom = selectedRoomArray[1];
But, it’s more common to use array destructuring and assign the returned elements to variables in one step:
const [ selectedRoom, setSelectedRoom ] = useState();
Array destructuring lets us assign elements in an array to variables of our choosing. The names selectedRoom and setSelectedRoom are arbitrary and our choice, although it’s common to start the variable name for the second element, the updater function, with set. The following would work just as well:
const [ myRoom, updateMyRoom ] = useState();
If you want to set an initial value for the variable, pass it as an argument to the useState function. When React first runs your Component, useState will return the two-element array as usual but React will assign the initial value to the first element of the array, as shown in Figure 6.
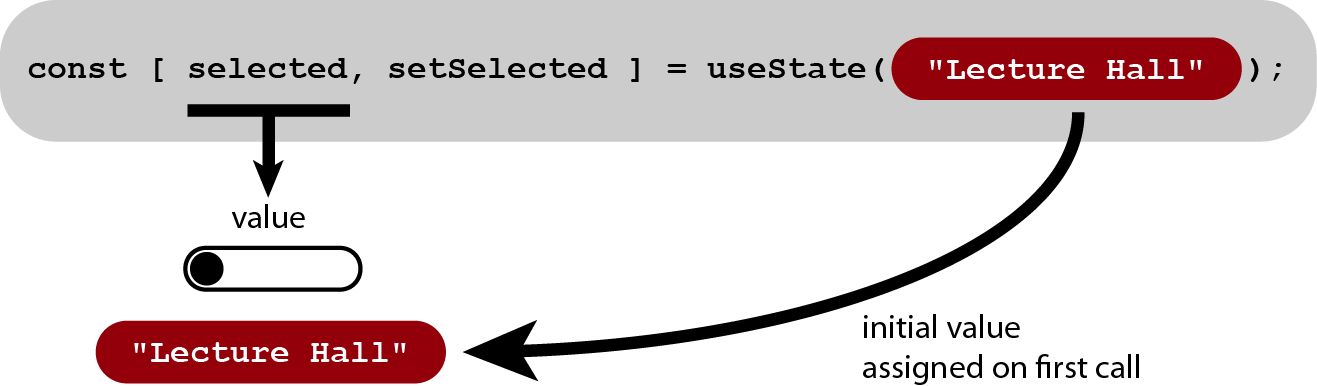
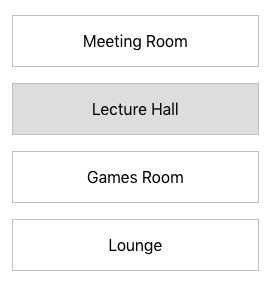
The first time the following line of code is executed within a component, the selected variable will be assigned the value “Lecture Hall”:
const [ selected, setSelected ] = useState("Lecture Hall");
Let’s create the Bookables component to use the useState hook to ask React to manage the value of the selected item’s index. We’ll pass it 1 as the initial index. You should see the Lecture Hall highlighted when the Bookables component first appears on the screen, as shown in Figure 7.
Listing 6 shows the code for the component. It includes an event handler that uses the updater function assigned to setBookableIndex to change the selected index when a user clicks a bookable.
import React, { useState } from 'react';

function Bookables ({ bookablesByGroup }) {
  const group = "rooms";
  const bookables = bookablesByGroup[group] || [];
  const [ bookableIndex, setBookableIndex ] = useState(0);

  function changeBookable (selectedIndex) {
    setBookableIndex(selectedIndex);
  }

  return (
    <ul className="bookables">
      {bookables.map((b, i) => (
      <li
        key={b.title}
        className={i === bookableIndex ? "selected" : null}
        onClick={() => changeBookable(i)}
      >
        {b.title}
      </li>
      ))}
    </ul>
  );
}

export default Bookables;
React runs the Bookables component code, providing the value used by the component to generate the UI. When a user clicks on a bookable, the handleClick event handler uses the updater function to tell React to update the chosen value. React then runs the Bookables code again, this time passing the updated value, letting the component generate the updated UI. React can then use the newly generated UI to update the display.
At this point, our Bookables component is very simple. But there are already some fundamental concepts at work, concepts that underpin our understanding of functional components and React Hooks. Having a strong grasp of these concepts will make future discussions and your expert use of hooks much easier. In particular, here are five key concepts:
- Components are functions that accept props and return a description of their UI.
- React invokes the components. As functions, the components run their code, and end.
- Some variables may persist within closures created by event handlers. Others are destroyed when the function ends.
- We can use hooks to ask React to manage values for us. React can pass components the latest values and updater functions for those values.
- By using the updater functions, we let React know of changing values. It can re-run the components to get the latest description of the UI.
In order to discuss concepts with clarity and precision, from time to time we’ll take stock of the key words and objects we’ve encountered so far. Table 1 lists and describes some of the terms we’ve come across:
| Icon | Term | Description |
|---|---|---|
 |
Component | A function that accepts props and returns a description of its UI. |
 |
Initial value | The component passes this value to useState. React sets the state value to this initial value when the component first runs. |
 |
Updater function | The component will call this function to update the state value. |
 |
Event handler | A function that runs in response to an event of some kind. For example, a user clicking a bookable. |
 |
UI | A description of the elements that make up a user interface. The state value is often included somewhere in the UI. |
Figure 8 shows some of the steps involved when our Bookables component runs and a user clicks a bookable. Table 2 discusses each step.
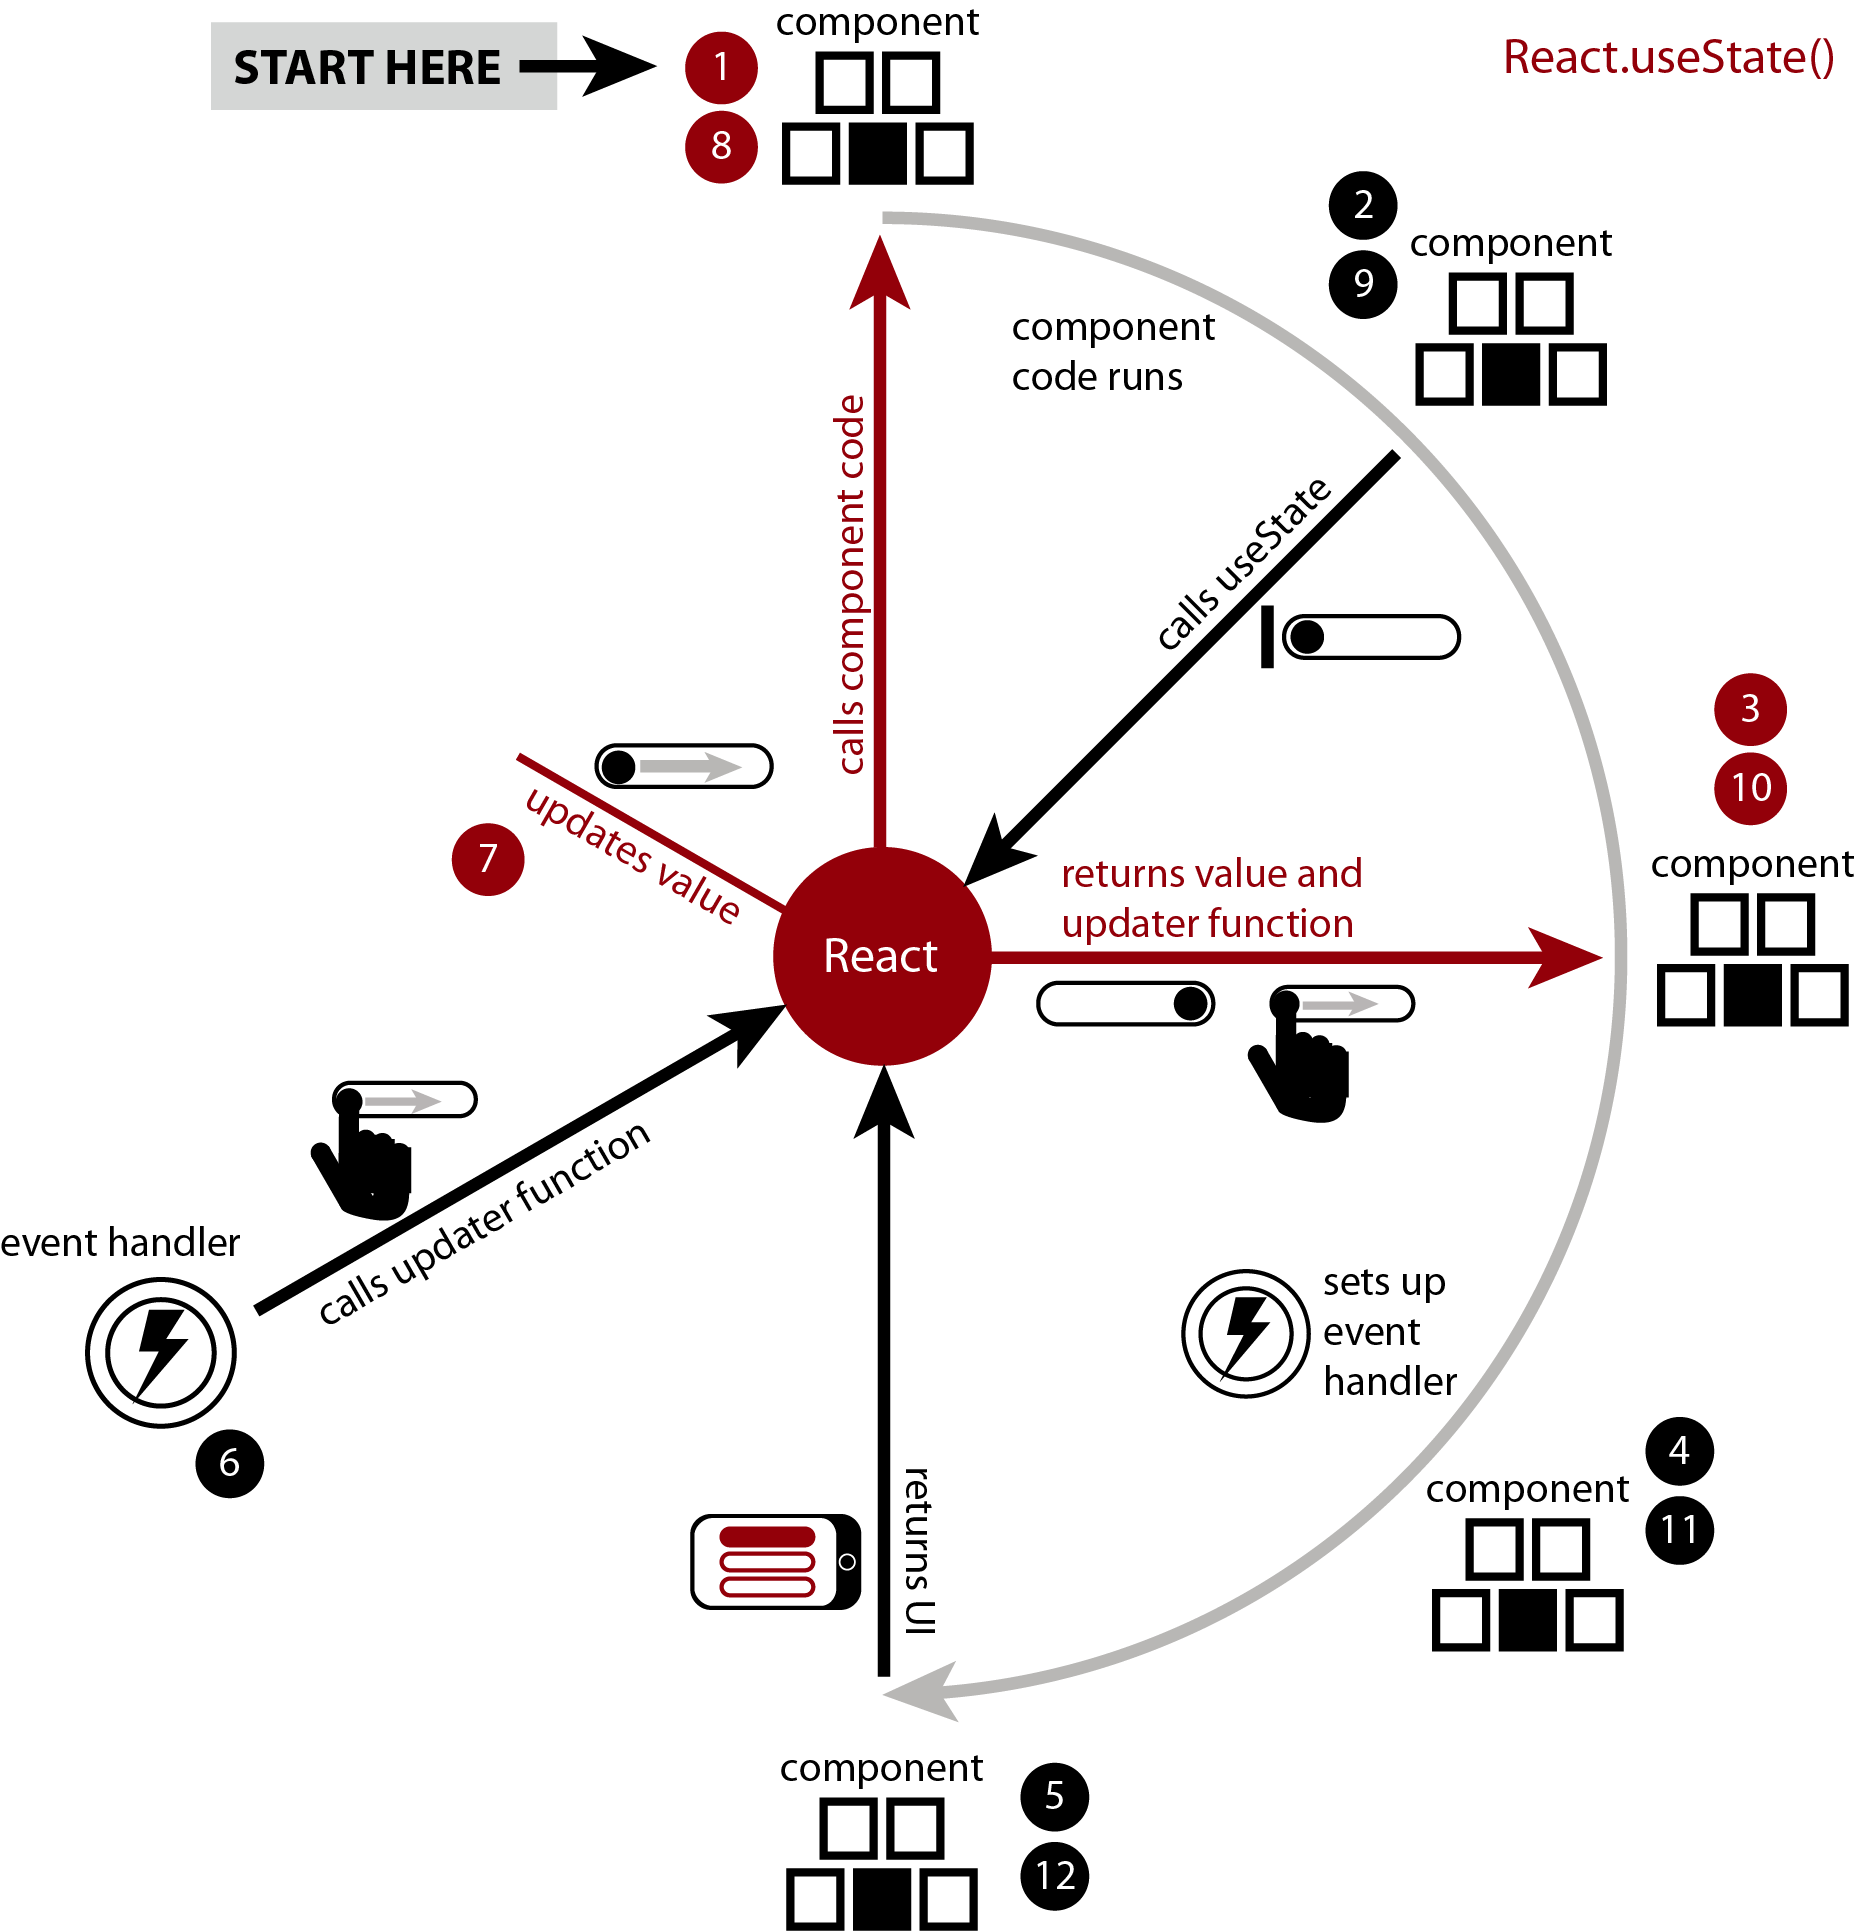
| Step | What happens? | Discussion |
|---|---|---|
| 1 | React calls the component. | To generate the UI for the page, React traverses the tree of components, calling each one. React will pass each component any props set as attributes in the JSX. |
| 2 | The component calls useState for the first time. | The component passes the initial value to the useState function. React sets the current value for that useState call from the component. |
| 3 | React returns the current value and an updater function as an array. | The component code assigns the value and updater function to variables for later use. The second variable name often starts with set. E.g. value and setValue. |
| 4 | The component sets up an event handler. | The event handler may listen for user clicks, timers firing or resources loading, for example. The handler will call the updater function to change the state value. |
| 5 | The component returns its UI. | The component uses the current state value to generate its user interface and returns it, finishing its work. |
| 6 | The event handler calls the updater function. | An event fires and the handler runs. The handler uses the updater function to change the state value. |
| 7 | React updates the state value. | React replaces the state value with the value passed by the updater function. |
| 8 | React calls the component. | React knows the state value has changed so must recalculate the UI. |
| 9 | The component calls useState for the second time. | This time, React will ignore the argument. |
| 10 | React returns the current state value and the updater function. | React has updated the state value. The component needs the latest value. |
| 11 | The component sets up an event handler. | This is a new version of the handler and may use the newly updated state value. |
| 12 | The component returns its UI. | The component uses the current state value to generate its user interface and returns it, finishing its work. |
React Hooks in Action
Keep learning! React Hooks in Action with Suspense and Concurrent Mode is published by Manning.